Part 2 of 3 — The Foundation Series on Prompt Engineering
A practical guide to DSPy — the framework that treats prompt engineering as a programming problem, not a craft problem.
The problem with hand-written prompts:
In Part 1, we built a great prompt using five parts: Role, Task, Context, Examples, and Format. We saw that better instructions produce better results — consistently.
But here is the problem that every AI product team eventually hits:
You have 8 modules in your pipeline. Each has its own prompt. Your evaluation shows module 3 is underperforming. You tweak its prompt. Module 3 improves. Module 5 gets worse. You fix module 5. Three weeks later, a new dataset exposes gaps in module 2. You start over.
You are spending more time engineering prompts than building product.
This is not a discipline problem. It is a tooling problem. And it has a solution.
The Solution – DSPy
DSPy (Declarative Self-improving Python) is an open-source framework from Stanford NLP, now stewarded by Databricks. Instead of writing prompts, you write Signatures — Python classes that define what goes in and what should come out of an LLM call. Then you run an Optimizer that automatically finds the best prompt to achieve that.
In DSPy, you define what your pipeline does — the modules, the inputs, the outputs, the flow.
The framework handles how to instruct the LLM to do each step. Those instructions — the prompts — are compiled automatically, not written manually, and saved in a JSON file that DSPy loads at runtime to assemble the prompt automatically — you never write or paste the prompt yourself.
You work at a higher level of abstraction, and a compiler handles the low-level details.
| Traditional prompting | DSPy |
|---|---|
| You write Role, Task, Examples, Format by hand | You define inputs, outputs, and a scoring metric |
| You iterate by editing strings and re-testing | You iterate by changing the metric and re-compiling |
| You own the prompt text | You own the structure and the metric |
| Prompts are brittle across models | Swap models, re-optimize — same structure works |
| More modules = more prompts to maintain | More modules = more to optimize together |
How can DSPy help you?
Here is the full picture before we dive into the code:
Step 1 — Collect examples from real end users. Label each one with what it should mean to your application — for example, a customer message and its correct intent. These are your training examples.
Step 2 — Define a Signature to specify your prompt structure — what goes in, what should come out, and any constraints on the output.
Step 3 — Define a metric function in Python that compares the prediction against the ground truth. This tells the optimizer what “correct” means.
Step 4 — Run the optimizer. It searches through your examples, finds the best few-shot combinations, and generates the best instruction text — all automatically.
Step 5 — Compile to JSON. The result is a JSON file containing the optimized instruction and examples. This is your production artifact.
In production: Before every LLM call, DSPy reads the JSON and assembles the prompt automatically. You never write or paste a prompt yourself.
Now you think, all of these trainings & optimization for just 1 prompt? No it is not.
What if the process of receiving data from LLM is a complex process? Lets take the customer care chat bot example to understand this framework.
Our customer care chatbot needs to do three things when a message arrives —
1. figure out what the customer wants
2. pull out any specific details they mentioned
3. write a helpful response.
Each of these is a separate LLM step with its own Signature.
With DSPy, each of these steps are not isolated executions, Step #3 needs to know the outputs of Step #1 & #2 (Intent and Entities). Wee need to run them in an Order. In DSPy, that is called a Module.

Yes, it’s a bit confusing 🙂 I know! That’s why we have a separate section for Module. Leave the confusion as it is and lets move on to the Signature.
Next, lets deep dive into the coding part. Define Signatures.
Signatures — what you write instead of prompts
A Signature is a typed Python class that defines one LLM step. Here’s the one we’ll use throughout this article — intent classification for a customer care chatbot.
The below code is a signature to classify the intent from customer’s message. Similarly we have to write signatures to extract parameters or generate responses.
class ClassifyIntent(dspy.Signature):
    """Classify the customer support message into a single known intent."""
    #    ↑ Docstring — this becomes the Task instruction in the prompt

    user_message: str = dspy.InputField(
        desc="Raw message from the customer"
    )
    intent: str = dspy.OutputField(
        desc="Exactly one of: track_order, cancel_order, refund_request, escalate, general_query"
    )
    confidence: float = dspy.OutputField(
        desc="Confidence score between 0.0 and 1.0"
    )
That’s it. No “You are a helpful agent.” No format instructions. No manually chosen few-shot examples. Just structure.
Each line and word in this signature matters, including the DocString is essential. Lets see which part contributes what in the prompt.
What is given as “desc” is optional in this definition but it is essential for the best prompt. So it is always recommended to provide “desc”. It will be used as a hint to LLM to understand the constraints. Here for example LLM will understand that the intent should be one of “track_order, cancel_order, refund_request, escalate, general_query”.
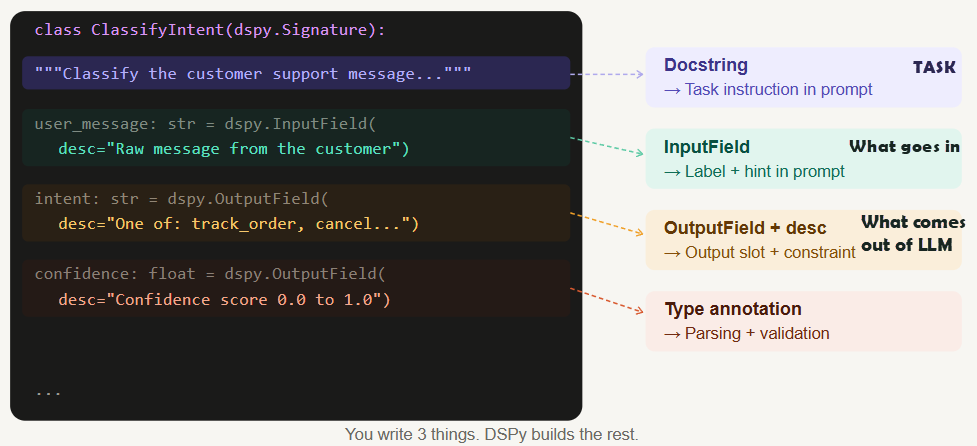
Now the prompt has the context. The main part is “Examples” & “Role” is still not yet composed by DSPy.
Chaining signatures into an agent
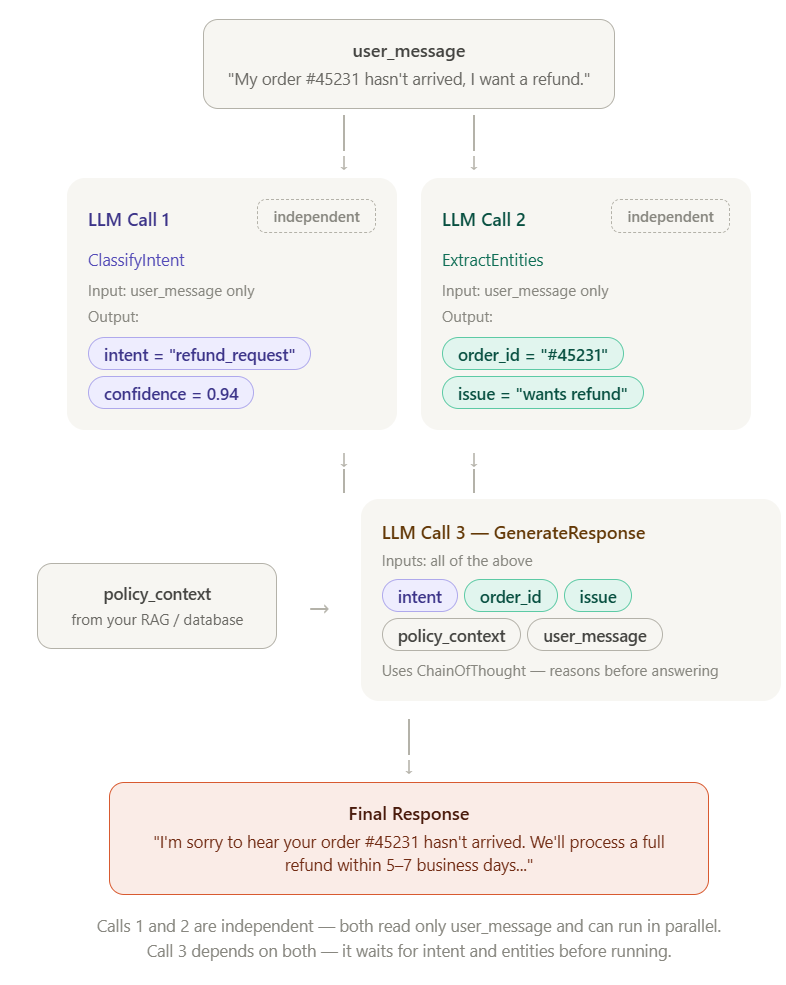
For our customer care chatbot, we need three LLM steps chained together. In DSPy, a Module does this:
class CustomerCareAgent(dspy.Module):
    def __init__(self):
        # dspy.Predict      → direct answer, one LLM call
        # dspy.ChainOfThought → adds reasoning step before answering
        self.classify = dspy.Predict(ClassifyIntent)
        self.extract  = dspy.Predict(ExtractEntities)
        self.respond  = dspy.ChainOfThought(GenerateResponse)

    def forward(self, user_message: str, policy_context: str = ""):
        intent_result = self.classify(user_message=user_message)
        entity_result = self.extract(user_message=user_message)
        entities_json = json.dumps({...})

        final = self.respond(
            user_message=user_message,
            intent=intent_result.intent,
            entities=entities_json,
            policy_context=policy_context,
        )
        return dspy.Prediction(
            intent=intent_result.intent,
            response=final.response,
        )
Now notice that both classify and extract calls takes only the user message as input. The respond call takes both output from Classify & Extract steps along with other required data.
The key insight: when you run the optimizer, it doesn’t optimize each module in isolation. It optimizes the whole pipeline together — because a great intent classification that leads to a bad response is still a bad system.
Now we have defined signatures and designed the Module (in other words Pipeline).
How to choose Examples & generate Instructions for best prompt
To find the best examples for your prompt, you need 2 components, an optimizer to evaluate which is best and a metric which defines what is best.
Optimizer – An algorithm runs your LLM against the training dataset, scores the outputs, and searches for the best combination to find the best examples AND (in MIPROv2) the best instruction text
Metric – You define what is best, a calculation to find the score from the result of the training
Training data    →   gives the optimizer raw material to search through
       +
Metric           →   tells the optimizer what score to maximize
       +
Optimizer        →   runs the search, uses LLM to test candidates
       ↓
Best examples (+ best instruction) injected into your prompt automatically
Optimizers — the three families
An optimizer takes your module, trainset, and metric, and searches for the prompt that maximizes the score. DSPy has three main families:
BootstrapFewShot
Fast starter
What it optimizes
Few-shot examples only. Does not rewrite instruction text.
What you need
Labeled examples + metric
Use when
You want fast results with clean labeled data
Cost
Low — few LLM calls
MIPROv2
Best quality
What it optimizes
Instructions + examples jointly using Bayesian search.
What you need
Labeled examples + metric + teacher model
Use when
Quality is critical and you can afford more LLM calls
Cost
High — best results
GEPA
No labels needed
What it optimizes
Instructions via LLM self-reflection and evolution.
What you need
Metric only — no labeled examples required
Use when
Data is hard to label but you can write a metric
Cost
Medium — ICLR 2026
We will take MIPROv2 for our example which is widely used.
MIPROv2 treats your prompt as having two variables it can optimize: the instruction text and the few-shot examples. Then it uses Bayesian optimization to search for the best combination of both.
Finally it produces a json, lets say miprov2_agent.json.
Metric:
def intent_accuracy(example, prediction, trace=None) -> bool:
    return (
        example.intent.strip().lower()
        == prediction.intent.strip().lower()
    )
Lets see how to train and Optimize the prompt:
teacher = dspy.LM("ollama/qwen2.5:32b", api_base="http://localhost:11434")
student = dspy.LM("ollama/qwen2.5:14b", api_base="http://localhost:11434")

optimizer = MIPROv2(metric=intent_accuracy, auto="medium")

optimized = optimizer.compile(
    student=CustomerCareAgent(),
    trainset=trainset,
    teacher_settings=dict(lm=teacher),   # teacher proposes instructions
)
What happens inside compile()
Step 1 — Bootstrap
Runs your agent on every training example. Collects the traces where the metric passed. These become the candidate demo pool.
Step 2 — Propose instructions
The teacher LLM reads your Signatures and proposes N variations of the instruction text. For example it might suggest:
- “Classify the customer support message into a single known intent”
- “Identify the primary customer need, even when the message is indirect”
- “Determine what action the customer is requesting”
Step 3 — Search
Tries combinations of (instruction variant, demo subset) against your eval set. Scores each combination using the metric defined above. Learns from each trial which combinations look promising. Runs this for N trials.
Step 4 — Select best
Picks the combination that produced the highest metric score across all trials.
Step 5 — Return optimized agent
Returns your CustomerCareAgent with the winning instruction and demos — ready to save and deploy.
What compile() does NOT do:
- It does not change your Signature structure
- It does not change your Agent code
- It does not fine-tune or retrain the LLM
- It does not touch model weights
The final JSON file contains 3 things:
- The optimized instruction text
- The best few-shot examples the optimizer selected
- The structure metadata DSPy needs to reassemble everything at runtime (in production)
Sample JSON file:
{
  "classify": {
    "lm": null,
    "traces": [],
    "train": [],
    "demos": [
      {
        "augmented": true,
        "user_message": "I've been waiting 3 weeks, this is completely unacceptable.",
        "intent": "escalate",
        "confidence": 0.97
      },
      {
        "augmented": true,
        "user_message": "Where is my package? Order #99102.",
        "intent": "track_order",
        "confidence": 0.95
      },
      {
        "augmented": true,
        "user_message": "I want my money back for order #55210.",
        "intent": "refund_request",
        "confidence": 0.93
      }
    ],
    "signature_instructions": "Identify the primary customer need, even when the message is indirect or emotional.",
    "signature_prefix": "Intent:"
  },
  "extract": {
    "demos": [
      {
        "user_message": "My order #45231 hasn't arrived.",
        "order_id": "#45231",
        "customer_email": "",
        "issue_summary": "Customer's order has not arrived."
      }
    ],
    "signature_instructions": "Extract all structured data mentioned by the customer, returning empty string if not present."
  },
  "respond": {
    "demos": [
      {
        "user_message": "I want a refund for my broken item.",
        "intent": "refund_request",
        "entities": "{\"order_id\": \"\", \"email\": \"\", \"issue\": \"Item arrived broken\"}",
        "policy_context": "Refunds processed within 5-7 business days.",
        "response": "I'm sorry to hear your item arrived damaged. We'll process a full refund within 5-7 business days to your original payment method. Could you share your order number so we can get this started?"
      }
    ],
    "signature_instructions": "Generate a polite, empathetic response that directly addresses the customer's issue using the policy context provided."
  }
}
This is the compiled output you need in production.
What goes to Production
The training set, the training code we used to run MIPROv2 (and the teacher model, if you have used different models for teacher-student style optimization, you can also use same model for both train and test) WILL NOT go to production.
Only the agent definition, signature of the prompt, compiled miprov2_agent.json WILL go to the production.
DSPy itself (dspy-ai in requirements.txt) also goes to production, because it is the engine that reads the JSON and assembles the prompt at runtime.
The next question is where do you write the Signatures, where do you use etc.
DSPy is something you work with at the time of development and most part of the code does not go to production at all.
Development
runs once · 15–60 min
Write signatures
Define inputs, outputs, and docstring for each LLM step
↓
Collect labeled examples
30–50 real input/output pairs covering edge cases
↓
Write metric function
Python function that scores prediction vs ground truth
↓
Run optimizer
~150 LLM calls · finds best instruction + examples
↓
Save agent.json
Best prompt frozen to disk · training data never runs again
↓
agent
.json
.json
best prompt
frozen
frozen
↓
deploy
Production
every request · 1–3 sec
Customer message arrives
User sends a message to your application
↓
Load agent.json
DSPy reads saved prompt · no optimizer · no training data
↓
DSPy builds the prompt
Saved instruction + examples + customer message assembled
↓
LLM calls per pipeline step
Response received
↓
Return result
intent, confidence, response returned to your app
The optimizer never runs in production. DSPy is installed but only does prompt assembly and one LLM call per request.
Development — happens once
Production — happens every request
From the above infographic, whatever you did till now are all in development. You still cannot see the prompt which goes to LLM.
DSPy takes in the miprov2_agent.json and runs it at runtime to build the prompt. The prompt is built on runtime and send to LLM. You can find the complete code for this example in the GitHub repo link given below in this article.
No optimization or training will be done in production.
Before you use DSPy — quick checklist
Before you run a single line of DSPy code, make sure you can check all five boxes:
A defined task — you know exactly what goes in and what should come out. If you cannot fill in a Signature cleanly, the task is not ready yet.
30–50 labeled examples — real inputs paired with correct outputs, covering normal cases and edge cases. This is your training data.
A metric function — a Python function that scores a prediction against a label. If you cannot measure “good,” you cannot optimize for it.
Time and compute — You need to optimize your prompt. Optimization is a one-time cost but a real one. Budget 15–60 minutes of GPU time depending on your optimizer and dataset size.
A stable pipeline — you have decided how many LLM steps you need and how they connect. DSPy optimizes your pipeline, it does not design it.
If any box is unchecked, finish that first. DSPy rewards preparation. The more solid your inputs, the more powerful the output.
Who uses DSPy — with real examples
DSPy is in production at Shopify, Databricks, Dropbox, JetBlue, Moody’s, and Replit.
Stanford’s STORM project builds Wikipedia-quality articles with it.
Teams use it to optimize RAG pipelines, customer care chatbots, legal document extractors, and medical QA systems.
The common thread: multi-step pipelines where hand-tuning prompts doesn’t scale.
Who should not use DSPy (yet)
You have no labeled examples – DSPy’s optimizers — especially BootstrapFewShot and MIPROv2 — need examples to work with. Not thousands, but at least 20–30 cases where you know what the correct output should be. If you cannot answer “what does a good output look like for these specific inputs?” you cannot write a metric, and without a metric the optimizer has nothing to maximize. You would just be running a very expensive random search.
The exception is GEPA (Article 3), which can optimize with unlabeled data — but you still need a metric that can score outputs without ground truth labels.
Your task changes every week – DSPy optimization is a one-time cost that pays off over many inference calls. If your task definition, intents, or output format keeps shifting — you are adding new fields, removing old ones, changing what “correct” means — you will be re-running the optimizer constantly and spending more time compiling than deploying.
Your pipeline has only one LLM call – If your entire application is one prompt — “summarize this document,” “translate this sentence,” “classify this review as positive or negative” — the overhead of DSPy is probably not worth it. A single well-written prompt with a couple of hand-picked examples will work just fine. DSPy’s real power shows up when you have multiple chained steps where errors cascade, or when you have a complex output format that is hard to specify in words. For a single call, the return on investment is low.
Quick decision guide, Who can use it?
| Situation | Use DSPy? |
|---|---|
| Still exploring the idea | No — prototype first |
| No labeled data, no metric | No — label first |
| Task definition keeps changing | No — stabilize first |
| Need to ship today | No — optimize later |
| Single LLM call, simple task | Probably not |
| Multi-step pipeline, need reliability | Yes |
| Have data, have metric, need consistency | Yes |
| Switching models frequently | Yes |
The complete notebook
Everything we’ve covered is available as a runnable Jupyter notebook — 10 sections you can step through live. It runs top-to-bottom: baseline eval → optimization → comparison → live inference with your own messages.
Jupyter Notebook: customer_care_dspy.ipynb
Running it locally
=> PowerShell (Windows)
# 1. Clone and enter the repo
git clone https://github.com/aasha01/DSPy.git
cd customer-care-dspy

# 2. Create .venv and install dependencies (run with .\)
.\setup.ps1

# 3. Pull Ollama models
ollama pull qwen2.5:14b
ollama pull qwen2.5:32b

# 4. Open in VS Code — kernel auto-selected
code .